How do self healing mats work Tips, Property tabletop protection advice
How Do Self Healing Mats Work
21 February 2022
Are you a keen hobbyist or an enthusiastic chef who always ends up with scratches and cuts on their tabletops and mats?
You might want to consider using a self healing mat. As the name may tell you, self healing cutting mats automatically “heal” after being cut, sliced through, or being damaged. But do these cutting mats really have self healing properties? Or are they made of magic?
For all the curious cats out there, we have curated a guide to tell you all about self healing cutting mats. So, let’s take a look at the “magic” behind these mats.
How Do Self Healing Mats Work?
Have you been pondering on the question “How does a self healing mat work?”
The concept behind self healing mats is quite brilliant, and you have to give it to the inventor to come up with such a unique concept. These cutting mats are made with separate tiny pieces of independent material that are pressed together to create a solid mat surface.
As such, when you use a craft knife or any sharp blade on them, it separates them instead of cutting through the material. These grooves that are formed by the blade then close up automatically in such a way that it seems like the cutting mat has “healed” itself.
Moreover, these unique mats contain memory retaining properties that enable the work surface to close back. Unlike regular cutting mats, they are made of special materials that separate the tiny particles instead of cutting the entire unit surface.
So, should you really believe in the self healing properties of these mats?
Well, not entirely, since these cutting mats don’t really “heal” themselves – it is simply the way they are designed. The cutting mat material ensures that all the tiny particles spring back to their original place, making it seem like they are magically healed.
Who Should Use A Self Healing Cutting Mat?
The primary purpose of a self healing cutting mat is to protect your work surface when using a blade, knife, or any other sharp tool on it. As such, these mats are meant for individuals who want to inflict minimal damage while still indulging in arts and crafts, chopping, or using sewing tools.
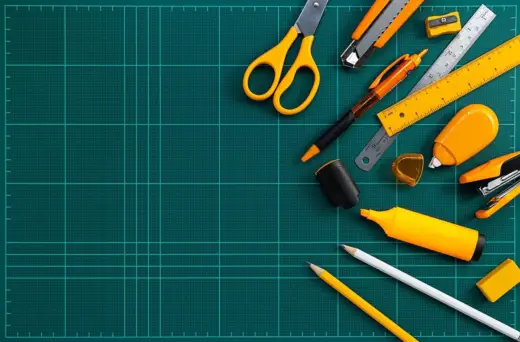
Another advantage of using a self healing mat is that it is generally designed with grid lines that can be used to make precise cuts and markings. There is no need for you to sit with additional tools like a scale, a measuring tape or a rotary cutting mat. The grid markings on these mats are adequate to prevent you from making inaccurate cuts.
Furthermore, these cutting mats can be quite beneficial for hobbyists who enjoy making clothes at home. The working surface of the mat is designed to withstand sewing needles, blades, and knives from damaging it. What’s more, cutting and sewing fabric on its surface is super easy and convenient once it is laid flat on a tabletop.
You can look for self healing cutting mats that come with a special non-slip surface as well. This is an additional benefit when you are working with stretchable or slippery fabrics that tend to slip off surfaces. Not just that, the non-slip solid surface can also protect your work table from an accidental knife slip and damage.
Lastly, these mats can help protect surfaces like your tabletop or kitchen counter as well. Hence, enthusiastic budding chefs or professional cooks can place a cutting mat on a solid surface or under a cutting board to protect it from accidental damage by a blade or knife.
What Is A Self Healing Cutting Mat Made Of?
Self healing mats can be made of multiple layers of different materials. However, the most common material used for these mats is PVC.
Some of the newer cutting mats are made of multiple layers of new and recycled PVC, making them very durable, resistant to high temperatures, and more sustainable. They are typically made of an amalgamation of unique composite PVC vinyl with solid plastic cores.
Once these layers are put on top of each other, they are ready to be painted and cut into smaller sections.
However, it is essential to use the right cutting tools and size the mats correctly before beginning the cutting process. Since these materials tend to become hard when they dry, cutting them into smaller sections can be challenging, eventually leading to sore hands.
Are Most Cutting Mats Heat Resistant?
Unfortunately, no. Most cutting mats are not heat resistant, and exposing them to high temperatures, direct sunlight, or heat can lead to a warping. Another reason why you may end up with a damaged or warped cutting mat is because you have not stored it correctly.
The best way to store a cutting mat is to let them sit flat on a surface such as a table. Most people choose to store their cutting mats on their workstations or working areas, moving them only when it is necessary.
Alternatively, if you cannot manage to keep your cutting mat laid out on a flat surface, try and keep it upright such that it is fully supported from behind. At the same time, ensure that it’s not bent or warped, as it will eventually damage the surface of the mat. Keep in mind that taking proper care of your mat is essential to ensure that it has a long life span.
If you need to use a cutting mat for high heat art or sewing projects, ensure that you check with the manufacturer before purchasing it. Most mats made of PVC and plastic will melt and warp under high heat, so you might have to look for an alternative.
What Kind Of Blades Should You Use On A Self Healing Cutting Mat?
The good news is that you can use a variety of blades, knives, rotary blades, and cutters on your cutting mat. Craft knives, cooking knives, sewing needles, and other cutting tools, including rotary cutters can also be used on these mats without worrying about damages.
That being said, you only have one important thing to be aware of – ensure that the rotary cutter or any other cutting tool you use does not have dull blades. Always use sharp blades on these cutting mats, as dull blades can result in slicing up the independent tiny particles on the surface of the mat, thereby rendering them useless.
Unless a knife is razor sharp, you run the risk of making inaccurate cuts and damaging the material of the mat. Unless a groove is formed correctly by a blade, the cutting mat cannot “heal” back, making them pretty much useless and causing permanent damage.
What Is The Average Lifespan Of A Self Cutting Mat?
Now, this depends entirely on the brand and materials used to make the cutting mat. Typically, self healing cutting mats are designed to last for about six years. However, there are some cutting mats that can last a lot longer, say about 20 years.
Of course, your experience of using the cutting mat will dramatically change once you replace it with a new one. After a point of time, you may notice that the grooves on the cutting mat are not “healing” as well as they once did. You may also notice the straight lines and grid work on the mat beginning to fade.
This is when you should treat yourself to a new cutting mat. That said, there are a couple of things that you can do to increase the lifespan of the product. Here are some tips that you can use –
1. Clean The Cutting Mat Regularly
Of course there will come a time when your cutting mat will need to be replaced. However, taking proper care and precautions can help increase its lifespan by quite a few years, so you can enjoy using it for years to come before replacing it.
Cleaning your cutting mat is quite straightforward and takes about 15 minutes. To begin the process, create a cleaning solution made with half cup vinegar and one gallon of water. An additional precaution you must take is to ensure that you use cool water only, as warm or hot water can damage and warp the mat.
Furthermore, avoid using any harsh chemicals to clean it. If you notice stubborn stains, marks, or any kind of damage on the cutting mat, we recommend replacing it with a new one instead of using chemical cleaners on it.
Next, brush the mat gently to remove all loose threads from it. Then, soak your mat in the cleaning solution for about 15 minutes, and add dish soap to a brush and gently scrub the mat. Remember not to apply too much pressure when doing this, as you can damage the tiny pieces on its surface.
You may notice that the mat is beginning to take its original form again, looking supple, clean, and ready to use. This is because the tiny pieces of material on the mat slowly absorb the cleaning liquid.
After doing this, air dry the mat by hanging it outdoors but avoiding direct sunlight. Allow it to completely dry before using it again. Moreover, never use a hair dryer or any other heating or drying agent to dry the mat.
Another tip before we move on to the next section – try keeping the mat hydrated at all times, as it can get worn out after constant use.
2. Store The Mat Correctly
Another easy method of increasing the lifespan of your cutting mat is to store it correctly. Avoid bending and warping it when you are not using it for a period. Most people tend to store the mat by placing it on their workstations without keeping anything else on top of it. You can store the mat this way if needed.
Or, if you are running out of space, you can also store the mat in an upright position. However, ensure that the mat does not bend when you store it, as it may damage and warp its surface.
Avoid using a blade on the same spot multiple times or for long periods, as it can damage it.
Can You Make A Self Healing Cutting Mat At Home?
In order to have a reliable and long-lasting self healing cutting mat, it is best to purchase it from a trusted store or shop online. However, if you want to attempt to make a cutting mat at home, go right ahead! It might be a fun project to indulge in, and who knows, you may even end up with an excellent product to use for years to come.
Here are the simple steps to make a self healing cutting mat at home –
Step 1 – Cutting The Cardboard To The Required Size
Take a piece of corrugated cardboard and cut it to the size you require. It is best to work with small sizes, as the larger ones can be difficult to cut, work on, and store. Try and keep the minimum size of the cutting mat to 8.5 to 11 inches. Anything larger than this will work just fine, but it is best not to cut it any smaller.
Step 2 – Wrapping The Masking Tape Around The Cardboard
You will need about three rolls of 1-inch masking tape for the next step. Begin by wrapping the masking tape at the top of the cardboard piece and working your way downwards. Make sure that you overlap the masking tape each time you pass it.
Then, turn the cardboard piece around by 90 degrees and repeat the same process with the masking tape. Continue doing this till you have covered the cardboard at least six times.
Step 3 – Make The Last Layer
Finally, apply one last layer of colored masking tape and cover the edges of the cardboard properly.
How do self healing mats work Conclusion
And with that, it’s a wrap! We hope you enjoyed reading this guide and understand how self healing cutting mats work.
Moreover, we hope that you are able to successfully make a DIY self healing cutting mat. Just follow the steps correctly, and you should end up with a pretty good product to use for a while. And always remember to clean and store your cutting mat correctly.
That’s all we have for you today. Keep an eye on this space for more such interesting reads and DIY tips.
Before we sign off, we have one last tip for you. Consider purchasing a self healing cutting mat, which can be used for different cutting activities. That way, you can save some precious dollars!
Comments on this tips on how do self healing mats work article are welcome.
Glasgow Building Designs
Glasgow Architecture Designs – architectural selection below:
Comments / photos for the How do self healing mats work advice page welcome


